Lumi
Lumi is a hand-held recorder shaped like a small action camera, built so a UMI demonstration does not require the robot. You hold the gripper, do the task, and press a button. The file on the card is an MP4 a UMI pipeline already knows how to read: video, plus an IMU track in the same layout as a GoPro.
The hardware page is Lumi collector. This chapter is the build, in the order you will actually do it. The plugin is solarian-lumi-collector.
Why it is not the robot
Teleoperating fifty episodes with the keyboard, or even with a leader arm, is slow, and the motion does not look like a hand. UMI's bet is that a demonstration should be a hand doing the task, with the camera on the gripper. Lumi is that gripper without the arm: a Pi Zero 2 W, an HQ camera, an IMU, a tiny screen, and a battery, in a body the size of a GoPro Hero 10.
The robot is still what runs the policy. Lumi only records.
Parts
From the hardware page, the pieces that have to be the ones in the CAD:
- Raspberry Pi Zero 2 W, with the header
- Arducam IMX477 HQ camera and a CS fisheye lens, with the 22-pin CSI cable the Zero uses
- Waveshare 1.44 inch LCD HAT (the buttons and the screen)
- An MPU-6050 IMU (GY-521), on I2C
- UPS-Lite, 1000 mAh
- A 40-pin stacking header, so the IMU can be tapped under the HAT
- A microSD card, 16 GB or larger, Class 10
The enclosure is the Onshape document on the hardware page. The body matches a GoPro Hero 10 footprint so a UMI buckle mount holds it.
The card
Use Raspberry Pi OS Lite, 64-bit. A desktop image on a Zero 2 W will page itself to death the moment the encoder and the radio run together. The plugin README names the image and the flash steps; follow that rather than a generic Pi tutorial, because the collector service expects Lite and libcamera.
Flash from the Raspberry Pi Imager. Enable SSH in the imager settings before you write the card. A Zero with no screen yet is only reachable that way.
Assemble
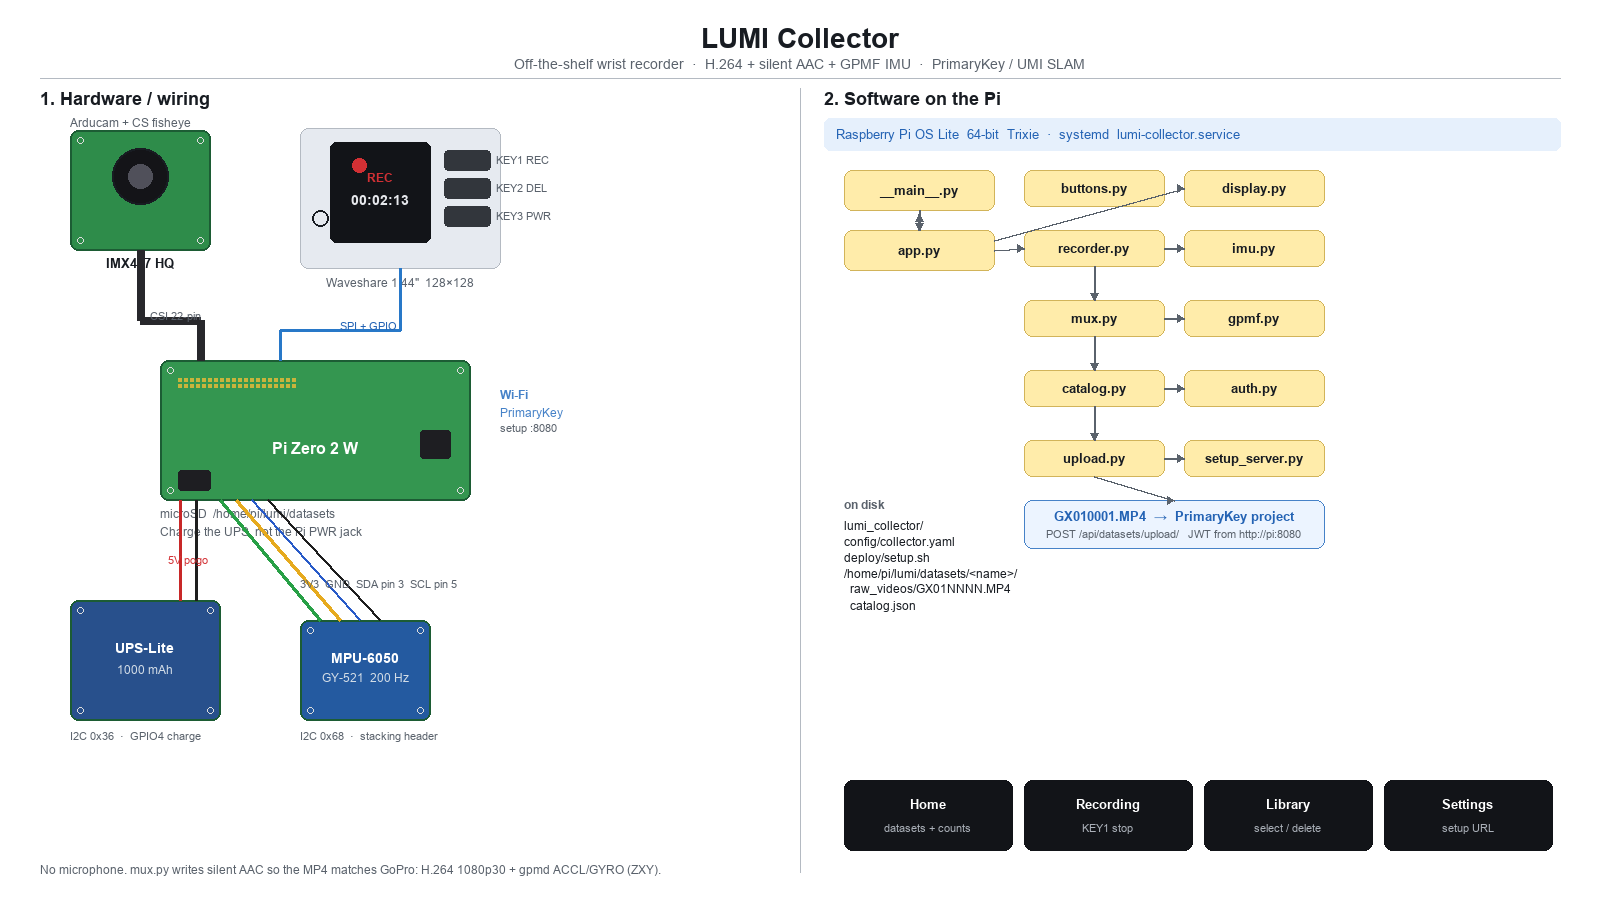
The architecture figure above is the wiring: CSI camera, HAT on the header, IMU on I2C under the HAT, battery on the UPS. The CAD is the mechanical order. A few constraints the software will not forgive:
- The camera connector on the Zero is the small one. The 15-pin cable from a full-size Pi does not fit.
- The IMU is powered from 3.3 V, address 0x68. 5 V into a GY-521 that is not expecting it is a dead IMU and a dataset with no motion track.
- Charge the UPS from its own micro-USB, not by back-powering the Pi.
Video to add. Assembling Lumi: flash the card, seat the camera, stack the HAT and the IMU, close the enclosure. Embed the URL here.
Figure to add. The finished collector in a hand, screen on, next to the robot's gripper so the two cameras are obviously the same idea. public/images/tutorials/lumi-hand.png.
See the picture before you record
Boot the collector and put it on its stream screen. From your laptop, with ffmpeg installed so ffplay exists:
solarian lumi --stream --host lumi-collector.local
You should see the live camera. Focus the lens on the distance your fingers work at, not on the far wall. solarian lumi --stream --policy shows the cropped view the policy will actually get, once a calibration exists. That check matters more than the wide preview. If the object is out of the crop, it is out of the dataset.
The collector's own README is the authority for the button that starts an episode and the one that throws a take away. Learn those two before the next chapter, on a test recording you are willing to delete.
Next: collect a dataset.